News from the Pipemaking Workshop with the Funk.
Talbert Pipes Website - Kentucky Fried Popcorn - My Web Comic.

Wednesday, October 17, 2012

The Sinister Finish

Here's something I've been working on for quite some time, a finish color for a very specific purpose.  While most pipes fall easily into either smooths or sandblasts, every once in a while I get the rarity that is surface-flawless enough to be a smooth, but just doesn't have very interesting grain.  Maybe it's loose, maybe it's uneven, maybe it's just plain meh, but for whatever reason, I have a perfect bowl that isn't going to make a particularly grain-pretty smooth nor a dramatic sandblast.  In other words, the perfect subject for a "Dress Black" finish similar to Dunhill's.

My recent work on the Halloween pipe reminded me of the other reason I wanted to nail down a nearly-black finish - For use on Halloween pipes.  And this is another perfect opportunity for our Ligne Bretagne pipes to serve as a testbed for techniques that will be carried upward... and probably not come back down again, because this is not an easy finish to pull off, especially in the LB price range.

The thing is, it's actually quite hard to create a nearly full-black finish, and that is exactly what I have in my mind's-eye - A nearly full-black finish.  What I want is not a 100% black but a 96% black... Almost fully opaque but with just the slightest grain showing, a hint here and there.  That's where the problems come in.  In most cases, the manufacturer wanting a dress black finish would simply paint it with an opaque stain, giving it a 100% even-colored surface.  That wouldn't leave me with any grain to display so I had to stick with other coloring methods - In the end, what I settled on was a natural wood darkening trick I learned in France to take the wood almost to black while still leaving some grain visible.  It has the advantages of being a deep color and not being something that will rub off with handling.  That's the issue that keeps me from simply using aniline black dye, because even without any compounding, a black-stained pipe would first come off too much under a carnuba buffing wheel (Giving me a lighter pipe than I want, plus a black-stained wheel) and then all over the smoker's fingers during early break-in.  This way, there's nothing to bleed out.

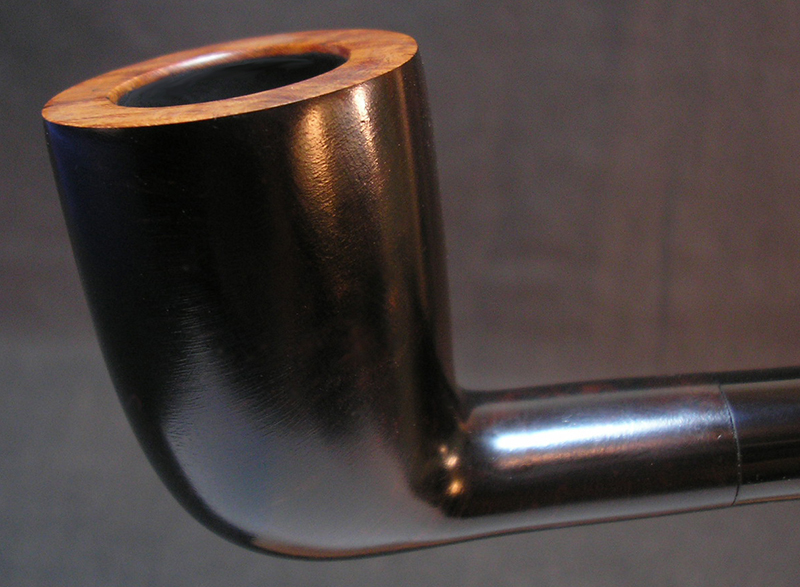
...Or at least I hope not, but I had to go and add one extra step for the pipe pictured here, which was a final application of a deep red stain, which helped give the black extra visual depth - An old artist's technique.  I've rubbed it back with alcohol to take off the excess, so I hope it won't give red fingers for the first couple of smokes.  A final bit of oil rubbing gave it a deep, natural, semi-gloss sheen that is not the high gloss of a compounded/waxed/polished pipe or a shellacked/lacquered pipe.

This is another example of a market test - I think it looks interesting and yes, a bit sinister in its monolithic darkness, but whether I make more will depend on whether this one sells.  I've got plenty of spot applications where I can use this finish on Halloween pipes, but whether it becomes a regular look among our Ligne Bretagnes and Talbert Briars will be up to whatever feedback I get on this one.


Saturday, October 06, 2012

Talbert Halloween Pipes, Rebooted

So, it's October and for the first time in a few years, I'm making Halloween pipes for open sale.  It's been a long and strange road to get here, and I want to explain just how and why I'm "re-imagining" my Halloween pipes.

I first made them 12 years ago, and at the time I was just getting started in the business and trying all sorts of ideas to see what worked and what didn't.  I had a fantastic time making them and was very proud of what I'd done, but after a few years of putting them out every Halloween and studying the costs of the things versus their labor hours, I came to the unavoidable conclusion that they were simply a deadly loss to make - Not one of them came close to covering the time investment of making them.  And so, for a very long period that covered most of the mid-2000's, the Talbert Halloween pipes went away.

Now they are back, and back in earnest.  I wasn't happy with not making them anymore because they're the most enjoyable pipes I produce.  But, they had to turn a living wage the same as anything else I make, so in the end I decided to do two things - A) Charge the prices for them that I needed to get in order to continue making them, and B) let out all the stops.  Literally, go all-out and stop worrying about how much time one is taking, how much money I can get for it, etc, and just make the most awesomely nightmarish, hideously detailed, and all-around excellent Halloween pipes that I could.  I believe this will more than justify their prices.  Again, they're an experiment now just as much as they were when I first created them - If the market won't bear it, this may be the end of them.  But, if they do sell, there will be more... and more.  I am fully prepared to work on Halloween pipes year-round, as the inspiration strikes, and the new Halloween pipe page on our site could become a permanent fixture, if this little project is a success.

Towards this goal, this first 2012 Halloween pipe is a good bit more detailed than past Halloweens, and offers up a unique and creative internal system as well.  I've had a new stamp made solely for the Halloween pipes... No more with just an "H" stamped after the Talbert logo.  From here on, the new Halloween stamping is this:

The new Talbert Halloween pipes will offer higher craftsmanship, higher value, and (I hope) a higher and more creative artistic sensibility drawn from my ten years of pipemaking experience since the last time I carved any of these beasties for website sales.    I hope you'll enjoy the new pipes, and wish me luck in this venture.  And now, on with the show!