News from the Pipemaking Workshop with the Funk.
Talbert Pipes Website - Kentucky Fried Popcorn - My Web Comic.
Showing posts with label Art. Show all posts

Wednesday, January 30, 2019

We can rebuild him

Another trip down memory lane with another 1998 pipe donation needing some work.  This pipe, which I informally dubbed the Marlowe after a certain PI, was one of the most difficult things I'd tried at the time, though looking at it now it's a terribly clunky thing -


To my credit, or excuse, it was my first attempt at a "classical" shape and done without a lathe.  This is a crucial point in understanding the thing.  While it may look a bit wobbly and thick, it was not smoothly cut while spinning solidly on a benchtop lathe... It was shaped by hand files while spinning on friction mounts chucked in my hand drill which was strapped to my workbench with screw clamps.  And this while sitting in an unconditioned garage in the evenings after an 8 hour workday.  The bowl "ring" looks terrible because I was too afraid of my wobbly mount flying off to try to cut deep into the wood! In a lot of ways, even though it doesn't look good, I'm happy it came out as well as it did considering the tools I was working with.  I'm particularly proud of the band fit I achieved - A silver band applied jeweler-style with heat expansion, which has held on perfectly through the last 21 years of use:


When it came back here, however, I couldn't leave it as it was.  For one, the stem was so loose it was falling out so that HAD to be addressed, plus I just couldn't bring myself to sell it again looking as lumpy as it did.

Where the heck to begin, though?  The constraints of the shape meant there wasn't a lot to work with, so no wholesale redesign was possible.  Instead, I adopted a point-by-point approach, fixing each individual issue first before taking an overall appraisal of the result.  First up - The primitive bowl ring was redone as a double ring surrounding a hand-rusticated center ring:


That served the dual purpose of fixing the original ring and also giving the bowl more visual "weight" to help balance that overly large shank.  Next up was tightening the shank-to-bowl join for a more polished and professional appearance:


All this detailing, however, could not get around the pipe's underlying visual issue, that the bowl was too small for the shank.  And this was an f-stop problem, because I couldn't "add more bowl" and the shank could not be made smaller without removing and almost certainly destroying the original valuable silver band.  In the end, I opted for a two-pronged approach - Giving the shank a VERY subtle taper inwards as it moved from band to bowl, and giving the bowl a beveled front edge.  That seemed potentially risky as it was removing mass from an already-too-small bowl, BUT... that mass was rounded and clumsy and adding some edges and detail would, I hoped, give the bowl enough extra visual weight and detail that it would offset the lost mass.  And voila:


"You can't make a silk purse out of a sow's ear" - It's a truth of life.  But, if you try hard and think about it a lot and put way more work into it than it deserves, you can sometimes turn a lost cause into a minor win with enough stubborn determination.


The problem now is... What the heck do I DO with it?  It has far more labor time in it than it's worth, given that in the end it's a 21 year old 1998 estate pipe restoration.  Also, annoyingly, I have gotten very fond of the thing.  It was a hard fought project both originally and in its "v2.0" recreation, and I can't help but think it would be an excellent pipe to add to my own collection.  I have little enough of my own work as it is, so maybe...

Monday, June 11, 2018

The Lizards are back in town


I realize the site has been inactive for quite a while.  This is about to change.  As most of our visitors and friends know, Emily and I have been distracted this past year via an ongoing family health crisis.  I may write more on that later, but the news of the moment is that the Lizards are back.

Yes, back in action, with their own dedicated photography stage too.  Even Baragon is back.

Check out the latest strip and leave us a comment at the link below!


Wednesday, April 06, 2016

Defining a Symbolic Language of Pipes

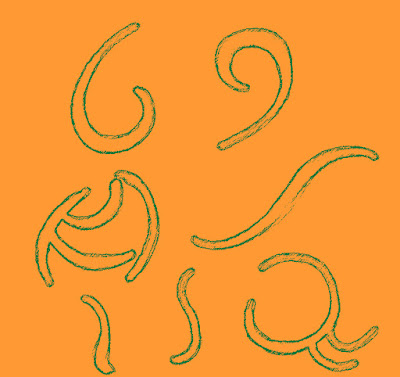
And how is that for an imposing and pretentious-sounding article title?  It isn't quite as esoteric as it might sound, though - Really, all I've been doing is gradually, over the years, assembling a visual "alphabet" per se, of the lines and curves and forms that I love in pipe design.  One can find pipe shape charts everywhere, but what I am after is more elemental, more of a fundamental means of building an attractive shape.  The Legos of Beauty, I might say.

(I will, however, readily admit that I'm one step from creating an alphabet in code form out of the lines and curves I'm defining, for the sole purpose of inserting secret words and riddles into the very shapes of the pipes I make... One of these days I'm going to go full-Kit Williams)

But enough of the prattle, let's see some pictures.  Here's one of of my symbol charts, where I've gathered together the basic curves and shapes that I love most:


In a nutshell, these are lines I have a passion for... specific curves and weights of line and flares and elegant twists that look good in pretty much any form, from nature to automobiles to human bodies.  There's an old-but-true saying that the more you can make your car/carving/anything resemble the curves of a reclining female, the prettier it will be.  What I'm trying to do is sit down and put together a fairly comprehensive collection of specific elements that can be blended together to create beauty to the eye, when they're put together in a harmonious way.

So far, so vague?  Let's try and showcase some of these lines in action:


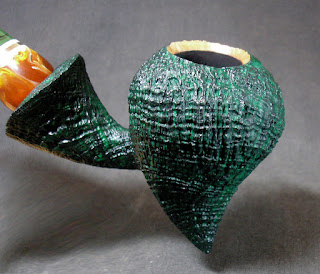
I dearly love the S curve, and try to work it into every bent pipe that I do.  Above and below you can see this philosophy as it's incorporated into the physical object of a handcut stem, in specific the stem of the Talbert Briar Emerald Teardrop.


S curves abound in my work, as well as teardrops and spirals.  Below I'm posting a few pics of the Emerald Teardrop - Take a look at the pics and the symbols above and see how many you can spot!


Thursday, January 28, 2016

Making a freehand

This is going to be a long post, but I'll try to keep the words to a minimum and let the photos do most of the talking.  Basically, this is how I make a freehand, and when I say "freehand", I mean a pipe with no advance planning as far as style goes.  The internal drilling is carefully plotted and it has a straight airhole connecting to a centered bowl chamber bottom, but as far as the shape went, I simply selected a plateau block with an unusual grain arrangement and decided to let the grain shape the pipe.  It's the antithesis of the working style that involves sitting down with graph paper and protractors and designing every detail of the pipe's shape beforehand.  Some guys are excellent at that, but I dislike working that way because it feels too mechanical for me.  On the other hand, working "without a net", so to speak, requires a LOT of courage and hope and the willingness to take crazy chances.  Both schools of design have their advantages and disadvantages.

Here you can see the total preplanning that was involved with this pipe.  Drilling angles, and a very basic idea of the shape size:


The initial shaping work defined the basic form along the flow of the grain.  It became obvious that the huge bird's-eye display across the front would be the centerpiece of the pipe.


The main surfaces are sanded smooth in the above photos to give me the most accurate idea of what the grain was going to look like, that I could then start fine-tuning the shape around the grain.  Also, it made a handy test to determine the level of flawlessness of the wood - If there were likely to be sandpits that would make the pipe a sandblast, they'd probably have shown up on those big smooth sections.

Next up was the stem.  I always work on the stem in tandem with the pipe so I can keep the two in visual balance with each other, as regards size and heft, and also match curves and lines.  Below you can see a smaller stem reject that I'm using as an initial model for this pipe's stem, which is handcut from German cumberland rod.


It's funny how my Taig lathe has become my favorite stem filing mount.  Takes all the strain off the wrists from holding the things by hand.  With a drill bit in each end, I can freely rotate the stem and compare the bit thickness to the size of the bit airhole, to get it thin without making it dangerously so.

Now you can see the pipe starting to come together.  The bit work is finished, leaving the body of the stem to be shaped to match the pipe.  The main shape of the bowl is now established along the lines of the grain flow, allowing the grain itself to determine the lines of the center curve that defines the pipe from front to back.  


It was still looking too chunky for me, though, so work from this point focused on tightening the base of the pipe inward - Still keeping to the arc of the grain, but emphasizing the strong heart-shape of the bowl via a more pointed bottom.


The bottom has been tightened inwards and the curves are more accentuated.  Now begins the stage of making the stem's freehand shape work with the pipe body.  Since it's a cumberland stem, it has "grain" of its own that needs to be considered and worked with, as well.  After some initial sketching of a couple of different ideas, I decide to go with a three-ringed approach using rings of diminishing size, with the nearest ring mirroring the curve of the shank end and the smaller ring curving in the opposite direction, giving a jaunty "flip" to the eye as it flares away from the bowl.


Once the basic shape of the stem rings was established and rough-carved, the bowl goes through a couple of processes to improve its initial smoking flavor, and is colored with a penetrating stain tint mixed with oil.  While that's drying, I work on finishing the stem in fine detail.  Once the pipe has received its final fine-sanding and polishing, it's finished!  What began as a block of wood is now a piece of sensually curving, smokeable craftsmanship.

_______________________________________________________________________

And that, above, is the "Making Of" part of my post.  This next bit is the "Why", where I'll attempt to explain a lot of the specific details of the shape and why they were done the way they were done.  This gets into the nature of how the eye sees lines and curves, but I'll try not to get too esoteric.

First up, I mentioned shaping the pipe around the grain.  This applies to a lot of the pipe that may not be initially obvious... such as the top arc line of the shank flare.  It wasn't chosen randomly.  When one looks down the length of the pipe, the arc of the shank's flat top edge follows the arcing curvature of the grain on the bowl:


Note that the curved swirl of the cumberland flows in the same direction.

It's not the only curve that matches, though.  The flat plane at the top of the shank mirrors the flat plane across the bowl top.  Moreover, the two stem rings are shaped differently for a reason - The larger one creates a visual echo of the bowl's round body curves:


The smaller stem ring, by contrast, is cut into a teardrop form that echoes the teardrop shape of the end of the shank:


Some of that is probably hard to make out in the photo.  Oh, for a better macro lens!   Even the top edge of the smaller stem ring has a gentle flattened curve to it that calls to the shank's top.

The other area of visual excitement that I wanted was in the shank & stem profile.  Why excitement?  The human eye loves matching curves - One of my art professors once stated bluntly, "The more your design reminds someone of a nude woman, the more beautiful people will find it."  While round shapes look nice in echo of each other, lines do best either converging or mirroring in opposition.  I could have made the stem lines copy the shank, but it wouldn't have been nearly as dramatic as this opposing curve (There's an edge there in the cumberland, which tends to look invisible in the photos due to the cumberland grain):


More curves playfully flip in opposing directions between shank and stem, giving the pipe a sense of dance, almost - Two in harmony, one in opposition:


Finally, the silhouette profile presents more curve harmony as multiple shapes echo:


In that respect, the dual-ring design of the stem shape becomes a smaller mirror of the relationship between bowl and shank flare.

And, in a nutshell, that's how I look at pipe design.

Thursday, August 14, 2014

So, I guess this is a Thing now...

Well, I made two more of my "kaiju and pipes" web comics, so that makes four now.  And they're still fun, so I guess that means this is a hobby now, too.  In recognition of that, I went and created a dedicated site for the strip on a web comics site, where it can enjoy the conveniences of a built-in framework tailor-made for comics with archives, chaptering, "Next/Previous/First" links, etc.  It should make it easier in future for people to browse the whole strip end to end, not that it's exactly going to have complicated running storylines or anything.

NEWBIES - Go enjoy the comic form the first strip HERE.

CURRENT READERS - To see the two latest strips, start HERE and click your way forward.

FUTURE READERS - Bookmark the Home page HERE and you'll always come to the latest strip!


Sunday, July 20, 2014

The Boys talk Kirstens, and Baragon commissions a pipe

I had so much fun doing the first one that clearly I should do more.  It's kind of cathartic, really.  Thankfully most customers are not like Baragon, but when you encounter one, they always make an impression...


Thursday, July 17, 2014

Sunday, October 20, 2013

Designing Halloween

Making one-of-a-kind pipes is not like designing repeatable shapes, where the design time is spread over many iterations and paid back piecemeal.  With a one-of-a-kind, the design cost is a direct part of the total cost, and sometimes it can be a large chunk of the total creation time.  I thought it might be interesting to write a post chronicling my entire experience of designing the latest Halloween pipe, from the initial commitment to the project to the final creation.

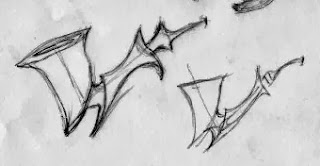
I started off with some very general sketches of a wide variety of subjects, but kept coming back to this sort of bowl shape.  I fiddled around with this idea and produced the sketch at left, which was ok but not really what I wanted - It was much more Goblin than Talbert Halloween, at least as I wanted this year's run to be, and ultimately it became a new Goblin after various tweaks and changes.  My problem with it was that it looked too overt and horror movie-ish, and my aim this year has been to make a set of Halloween pipes that were both surreal AND intense without resorting to the obvious prior tropes of claws, teeth, etc.  So, while I liked this look, it got rejected, and I moved on to other ideas...

There followed a period of creative frustration as I sketched out idea after idea, playing with all sorts of curves and organic shapes as I searched for something that looked "right"... when I wasn't sure even what I wanted, just that I'd know it when I saw it.  None of the above were "it", though I like a couple of them, particularly the lower right design, above, a weird combination of slug and scorpion.


I started thinking about layouts that were further from the traditional pipe design, and sketched out the pipe to the left, above.  It's a cool looking thing though it would have some basic problems, like weight distribution and leakage around the stem from condensate flowing down... Still, an intriguing idea I may revisit someday.  But it wasn't until I did the quick sketch of a Cavalier-style pipe, above right, that I suddenly said, "Yes, that's it."

But, of course, that wasn't "it", at least not yet - That was just the first step in pinning down what I wanted.  I had a basic bowl and shank idea and I ran with it in more sketches, thinking in terms of a sort of "alien bone" look, with an elongated thin shank section and some sort of Calabash-style bowl perched at the end.  I loved the design, but already I had a nagging at the back of my mind telling me this was going to be much harder to pull off than it might initially look...

This is a classic case of one of the main Pipemaker Problems - The imagination gets ahead of the function.  I love the above designs, but they have all kinds of issues.  The excessively long pointy bits would be fragile as hell, and prone to breakage.  The airhole couldn't connect from mortise to bowl.  The very curves that I liked played hell with the drilling angles internally.  I did, however, really love the "Mad Scientist" feel of the design, and kept at it.

...BUT, not to the exclusion of other ideas.  It's important not to get too fixated on one concept, especially one loaded with problems to surmount, so I sketched some other, similar themes as well:


The pipe on the right was a nice, straightforward expansion chamber design, but too simple, I thought, for a Halloween pipe - This was something for a regular Talbert Pipes stamp, perhaps a Signature piece but not a Halloween pipe.  The one on the left, by contrast, looked plenty "Mad Scientist" but had drilling issues of its own, plus the potential hell of having to make a handcut churchwarden stem.  99% of all churchwarden stems you see on the market are molded, and here's why - Making a handcut churchwarden stem from rod stock is nastily expensive, for one, as it will take up the material of at least three normal stems.  It's also hard-to-impossible to drill depending on length, because most lathe beds used by small shops aren't long enough to accommodate a long rod section and the extended length drill bit needed to drill the airhole.  All that unsupported length wants to flop when spun and I don't have a lathe support for long stock.  Then you have to shape and file the damn thing, which is 3X the work of any normal length stem plus the additional hell of making sure the full length is perfectly smooth linearly and not ripply or fluctuating in thickness.  It's a major pain.


The problem was, my preferred idea was rife with issues too.  The proportions of the design were going to require a HUGE briar block (seen in the faint outline) to allow the shape, and even with an extra-large block, the eventual pipe would seem a bit small - The two deciding factors were the top-to-tip distance from bowl rim to bottom point, and the point-to-point length of the shank section.  That's a lot of briar.  Ultimately unsatisfied with the shorter bowl heights possible, I looked into making it a component pipe of many pieces.  In the sketch above, you can see some of my notes where I debated making the bowl-only from briar, and then fitting it via some sort of joiner to a shank section made from briar or meerschaum.  I kept turning over material combinations and it kept getting more and more ridiculously complex, but none of the ideas I had got me around the fundamental problem of the layout, which was the expansion chamber.  Since the bowl airhole and stem couldn't directly connect, it would need to be an expansion chamber design, which meant a large open shank section... completely at odds with the design's thin and delicate shank.  The inward curvature of the shank meant a long, narrow expansion area and hard limits on how much "recurve" I could give the profile lines.

Frustrated again, I rethought.


The above-right sketch came first.  What if the shank were compressed?  That is, use the much-obsessed-over design but "squish" the shank inward, making it fatter instead of long and fragile.  I liked the first sketch but it needed refinement, which it got in the above-left drawing.  When I looked at that, I knew it was "it" - Something that looked appropriately "Mad Scientist-Insane" without resorting to fangs and skulls, yet was also a solidly practical layout with a large shank for the expansion chamber, good weight distribution, and compact proportions that would let me get a large bowl out of a single block of briar, making the thing all of one block.

I had a couple of minor changes - The stem was too large for any available rod stock diameter, and furthermore not even workable due to the curves I wanted in the shank section.  I ditched the idea of a shank ring on grounds that the strength of the design was in the profile, and too many extraneous details would overcomplicate it fast.  That led to the working layout below.

The bowl is a deep conical design with a centered airhole going down at an angle to open into the shank's expansion chamber.  The chamber still needed to be narrower to accommodate the deep top and underside curves of the design, but it would be quite deep.  The stem's tenon would socket into the expansion chamber drilling, with a larger cutout for the wider body of the stem itself.  To the lower left you can see a crude top-down sketch - Always draw any design from multiple angles to see if it's going to have any major awkward elements that will hurt the theme.  I was finally happy - It solved every issue of the original "Version 1.0", with thicker "pointy bits" (and thus more durable), as well as a bigger chamber, a taller bowl, and a somewhat more aggressive stance.

And that's how I got to this!


Monday, April 01, 2013

Composing vs Performing


I do a lot of very varied work in pipes - It helps keep me sane and enthused about what I'm doing, which can get a bit repetitive when you've been doing it this many years.  The divergent ways that I will approach a project are as fundamentally different as the projects themselves, and I thought I'd write a little on the subject.  For starters, the first question I ask myself is, "Is this going to be a composition or a performance?"  I speak of this in the musical context and for me it is the key difference between whether I'm working on an original design of my own, or on an interpretation of a known classical shape.  

Creating an original shape is, in essence, composing a piece of music - You've got as blank sheet and work from them, arranging elements in ways that tickle your fancy.  When working from an existing design, however, as with the two pipes I'm using as examples below, I liken the creation experience more to a public performance of an existing composition.  You have the music sheet already, you know what the melody is, you know what parts to put where, and it's all down to your own skill and personal interpretation as to how the playbook will be rendered for the audience.  

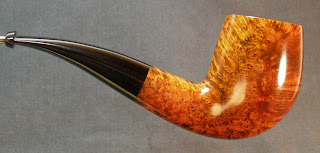
This is the point where you have to make the interpretation your own, to make this specific individual performance something unique and distinct.  For example, have a look at this bent billiard I've just completed:

I went in with the intent to make something simple and elegant - The classical bent billiard - a shape straight out of the "Ceci n'est pas une pipe" painting.  It sounds like one might be locked in, but that's far from the case - There's actually a great deal of leeway for personal expression in the minute details of such a design.  One of the most obvious is in curvature, especially shank and stem curvature.

If I were to try and list my own distinct "Talbert" hallmarks in design, one of the tops would be a freedom of flow from shank to stem to bit... Smooth curving lines that arc elegantly, without "humps" and sudden jarring curve changes from shank to stem.  In silhouette, it should look like one single piece of material that's unfurling, without a clearcut deviation between stem and shank... unless that is the specific desire.  Again, it's a matter of performance and mood, like an evening concert.  It can be hypnotic and melodic, it can be hard and sharp, it can be raucous, it can be upbeat, it can be downbeat, and all of these renditions can be drawn from the same basic musical composition (or in our case, shape library).

For this piece, smooth elegance was the concept, to the point of being nearly sensual.  On other pipes I might have gone for a tighter join of shank to bowl, but here, that was the opposite of what I was after - I wanted the bowl mass to transition smoothly from the thickest part of the bowl to the shank in a way that let the weight visually shift backward... One organic, unified piece of polished wood instead of distinct parts fitted together.  I did not want the fingers to rest on an edge, anywhere on the pipe.

(For contrast, check out this recent bulldog, which is all about hard edges - Everything in it is beveled, planed, and tight of line.  It's a brass ensemble to the billiard's soft woodwind.)

It's through the small touches like this, as well as finishes, that one maker defines his own aesthetic from another.  While some might think that doing a classical shape would represent being "roped in" or limited in terms of creative expression, it can actually be quite liberating once you're technically proficient enough to really play with the basic elements of the design.  Musically speaking, think of someone like Apocalyptica - A group of classically trained cellists who play Metallica songs.  My own version of that sort of whimsy represents itself like this:


Yes, it's a bent billiard!  In the "bones", per se, it is essentially the same pipe as the curvy example above, and yet the multitude of small differences make it an entirely different visual and tactile experience.  Rather than sensual, I wanted its theme to be fat, chubby, and if I dare say so, jolly.  The first billiard says, "Paint me like one of your French girls."  The second billiard chortles by the Christmas stockings.  Same maker, same functional underpinnings, but two entirely variant results with a distinct personality to each.  Moreover, as individual, handmade items, it's a personality that can't be replicated exactly for future pipes.

...Which is not unlike an evening's live concert performance.  You might hear the same notes being played similarly by the same group on another occasion, but you'll never hear that exact performance again.