News from the Pipemaking Workshop with the Funk.
Talbert Pipes Website - Kentucky Fried Popcorn - My Web Comic.
Showing posts with label Pipemaking. Show all posts

Wednesday, January 30, 2019

We can rebuild him

Another trip down memory lane with another 1998 pipe donation needing some work.  This pipe, which I informally dubbed the Marlowe after a certain PI, was one of the most difficult things I'd tried at the time, though looking at it now it's a terribly clunky thing -


To my credit, or excuse, it was my first attempt at a "classical" shape and done without a lathe.  This is a crucial point in understanding the thing.  While it may look a bit wobbly and thick, it was not smoothly cut while spinning solidly on a benchtop lathe... It was shaped by hand files while spinning on friction mounts chucked in my hand drill which was strapped to my workbench with screw clamps.  And this while sitting in an unconditioned garage in the evenings after an 8 hour workday.  The bowl "ring" looks terrible because I was too afraid of my wobbly mount flying off to try to cut deep into the wood! In a lot of ways, even though it doesn't look good, I'm happy it came out as well as it did considering the tools I was working with.  I'm particularly proud of the band fit I achieved - A silver band applied jeweler-style with heat expansion, which has held on perfectly through the last 21 years of use:


When it came back here, however, I couldn't leave it as it was.  For one, the stem was so loose it was falling out so that HAD to be addressed, plus I just couldn't bring myself to sell it again looking as lumpy as it did.

Where the heck to begin, though?  The constraints of the shape meant there wasn't a lot to work with, so no wholesale redesign was possible.  Instead, I adopted a point-by-point approach, fixing each individual issue first before taking an overall appraisal of the result.  First up - The primitive bowl ring was redone as a double ring surrounding a hand-rusticated center ring:


That served the dual purpose of fixing the original ring and also giving the bowl more visual "weight" to help balance that overly large shank.  Next up was tightening the shank-to-bowl join for a more polished and professional appearance:


All this detailing, however, could not get around the pipe's underlying visual issue, that the bowl was too small for the shank.  And this was an f-stop problem, because I couldn't "add more bowl" and the shank could not be made smaller without removing and almost certainly destroying the original valuable silver band.  In the end, I opted for a two-pronged approach - Giving the shank a VERY subtle taper inwards as it moved from band to bowl, and giving the bowl a beveled front edge.  That seemed potentially risky as it was removing mass from an already-too-small bowl, BUT... that mass was rounded and clumsy and adding some edges and detail would, I hoped, give the bowl enough extra visual weight and detail that it would offset the lost mass.  And voila:


"You can't make a silk purse out of a sow's ear" - It's a truth of life.  But, if you try hard and think about it a lot and put way more work into it than it deserves, you can sometimes turn a lost cause into a minor win with enough stubborn determination.


The problem now is... What the heck do I DO with it?  It has far more labor time in it than it's worth, given that in the end it's a 21 year old 1998 estate pipe restoration.  Also, annoyingly, I have gotten very fond of the thing.  It was a hard fought project both originally and in its "v2.0" recreation, and I can't help but think it would be an excellent pipe to add to my own collection.  I have little enough of my own work as it is, so maybe...

The Past - You can run from it or learn from it


The Saruman


Let's roll back to 1998.  We all accessed the net with dial-up modems and most online pipe chat happened in Alt.Smokers.Pipes and on IRC.  The Lord of the Rings movies hadn't come out yet, and there was no advance publicity about them.  LOTR was still simply this quiet, understatedly amazing fantasy series known mainly to voracious readers and fans of fantasy and SF.  Back in that distant time, I'd been making pipes for a few years for friends, and the main theme I kept returning to was LOTR.  I'd done hobbit pipes, Lothlorien pipes, and more.  But once I'd won the Pipes & Tobaccos carving contest and interest started to pour in, I wanted to up my game and start making some genuine, professional level pipes to sell.

(A side note - Originally I took this pipe and two others to a local brick & mortar shop, which was the traditional way to sell at the time.  The pipes sat in their shop for a week and they called me to say come get them, they're not selling.  Being savvy in this new internet stuff, I took them home and sat for an evening and wrote up my very first website, then put them on it.  All three pipes sold immediately and I pocketed all of the money instead of half of the money.  With that one event, my career, and selling philosophy, was set in motion)

This pipe was the first I ever sold.  With it went a scroll that I wrote up and signed, along with some printed-out comments from Usenet, February 1998.  Recently it's come back here as a donation to help with our fundraiser for my wife (Full details HERE), after she and her parents suffered a string of health issues and natural disasters all through the nightmare year of 2018.


Getting it to a saleable condition, however, was a challenge!  I would ideally have left it as-is, but the stem literally fell out of the mortise, it was so loose.  Back then I turned it too loose to start with, and didn't know enough to ignore a bit of very bad advice I got from the internet, the old "Heat and squish" trick.  A lot of guys will tell you this - If your stem is loose, just heat it up and press it against something and it will bulge and then fit tighter.  This is an awful "solution" because what you get is a tenon with a wide part that will eventually wear the mortise down to its own size, making the rest of the tenon not contact, wobble, and eventually loosen and fall out.  But, alas, I didn't know any better and 20 years later it came back to haunt me.

This was going to be a major challenge, because it needed an all-new tenon but I had to fit it, centered, into an original stem that was hand-rounded, do it without taking any thickness out of the thin mortise walls, and be able to match the naturally-colored 20yo stain for any parts I did sand.

Annnd... Wouldn't you know it, but the original stem exploded when tightening in the threaded replacement tenon.  >POP< and that was it.


BUT, once it was obvious I needed to make a whole new stem, I was really quite happy, because I feel like now I can do a considerably better job than I did on the original:


Also, I had the chance to improve one aspect of the design.  Back then, I drilled the pipe as a moisture well/expansion chamber pipe, Peterson-style.  The airholes of stem and shank deliberately did not connect and the well took the moisture.  Over the years since, I've come to prefer a connected airhole, and I had the chance to fix this quirk on this pipe by using a technique I dreamt up 15 years ago or more, the guided tenon outlet.  In a nutshell, rather than having the airhole centered in the tenon tip, I drilled a smooth, subtly angled airhole within the tenon that let the opening exit on the front side.  Voila:


The result?  A pipe that was never intended to pass a pipecleaner... will now pass a pipecleaner, from bit to bowl!


It looks a bit odd up close, but it does the job nicely, and I've found over the years that this technique opens up a lot of shape curvatures and drilling angles that were previously unworkable.  Now when I post this pipe for sale, again, it will be the best of both worlds - A beautiful, professionally cleaned and waxed example of my early carving style with the bowl in untouched original form, and a modern, better-cut stem coupled with a much improved airhole connection.  Most people never get the chance to go back and make something from their past better, so I find myself oddly grateful to have had this run through our workshop once again, after all these years.


Monday, October 08, 2018

Reworking the flashback

Very recently, I've gotten my hands on a small treasure trove of my older work which I'll be cleaning up and selling in order to raise funds to help pay for my wife's cancer surgery.  It's been a fascinating trip down memory lane, particularly in regard to the oldest pipes of the bunch (I've got the first two pipes here that I ever sold!).  A few of these are even unsmoked after all these years, so it should be a nice selection of goodies for any avid Talbert collectors out there as I gradually get the pipes photographed and posted. 

It has brought me up against one annoyance, though, which every artisan can relate to - The chance to look back in up-close dismay at the amateurishness in some of the early work.  In my defense, the late 90's were a different universe from today in terms of pipemaking.  No YouTube How-To videos, no Pipemakers' Forum, no thousands of websites showing step-by-step processes, and no custom makers of pipemaking tooling either.  Everything that I was doing, I had to figure out for myself, as there was no pile of YouTube tutorial videos telling me how to make a turned brass shank end cap. 

In some ways I think this was good, as the profusion of pipemaking help available today has led to a certain sameness in output, in my opinion... Everyone is following the same process steps, aiming at the same goals, and producing very similar results.  But it also produced a lot of learning-by-breaking and learning-by-screwingup. 

A case in point - The 1999 Talbert Briar Yule Pipes.  This was actually the second Yule Pipe set I'd done after a little three pipe foray in '98, but this was a big first for me in lots of ways.  It was the first time I'd tackled doing a matching ten pipe set of the same shape and it was the first time I'd used brass rod (I drilled out and turned solid rod to make the shank end bands for each pipe).

I've got three of these '99 Yules here to sell, but looking at them, I'm choosing to fix a few issues they have to "modernize" them a bit.  To wit:


Above is an as-yet un-improved '99 Yule.  I look at it now and am immediately thinking, "Wow, the stem's too fat, it needs to lose a lot of weight in the middle and that ring section needs to be moved closer in to the shank, and re-turned to better echo the brass ring, because right now it doesn't stylistically match at all."

A little work later, and I've tweaked the stem on another one like so:


Purists, I suspect, will be horrified by this altering of past work and I'll probably be getting a few emails fussing over how much better the original looked, even though it didn't.  The revised version removes that awkward visual bulge where the stem was fatter than the shank ring, and retunes the stem's ring to be a much better match for the brass ring. 

More important than the visual are some functional improvements.  Back in '99, I was doing very simple bit slots (All of that stuff about, "You MUST have a deep V slot, blah blah blah" that's considered so important today... NONE of that was given any credence back then).  I really wanted to improve this part of the pipes so I've been widening the bit slot and carrying the V down into the stem to make for much easier pipecleaner passage.  You can see the difference below, with an unmodified '99 Yule stem on the left and a newly-modified '99 Yule stem on the right:


I don't plan on drastically altering the shaping of any of these older pipes, but I do feel that some functional visual and internal improving is well worth it, much like all the guys that buy old GTOs and immediately fit them with four wheel disc brakes!


Wednesday, March 01, 2017

Meet the Gnomes!


Back when we were readying to leave Brittany to return to the US, we had to choose what we brought and what we left behind.  We brought all of our morta stock, all of our briar stock, and roughly 20,000 rough-turned Ligne Bretagne stummels in medium and larger sizes.  What we left behind, however, were entire crates of tiny stummels... Group 1-sized billiards and others.

I opted to leave most of the smallest bowls behind because they cost shipping money and were commercially unmarketable.  Despite the fact that tiny pipes take as much labor as larger ones, buyers tend to equate size with value and when they see a very small pipe, they expect an equally small price.  That puts the maker in the difficult position of either slapping together a cheap pipe at very high speed, one whose craftsmanship would reflect badly on the rest of his offerings ("I bought one of X's $45 pipes and it was really poorly done, why would I ever spend three times the price for one of the others?") or of taking a big financial risk by producing a lot of very well-done tiny pipes that would be costly for their size, and might very possibly sit unsold for weeks, months, or years.

Recently, however, two events came together perfectly here.  First, we created the Ligne Bretagne Classic - A line of standardized designs that could be made to order here in our shop, thus negating the financial risk of carrying a lot of inventory that might or might not sell.  Secondly, my wife came in the other day from the garage holding a bag of small turned bowls.  She'd been digging in some long-unopened boxes of briar for something else, and found a bag of small bowls that we'd decided to bring along with us just for fun.

At that point we both realized... We don't have to gamble on making a bunch of tiny pipes that might not sell.  We can make them to order, just like the LB Classics.  That way, fans who want a tiny pipe can get one, and I don't have to risk sitting on hundreds of dollars of stock if they're not popular.

Then, of course, the idea of GNOMES hit me, and that was that, a whole new pipe series for Ligne Bretagne!  The bag of bowls that Emily found contained roughed shapes that could be turned into 24 sandblasts and a couple of smooths - The usual ratio for any pipes not being spackled with putty.  But... We've got plenty of other smaller bowls that don't get used a lot, just because they're smaller than normal and people already complain that Ligne Bretagnes tend towards the smaller size range.  Grouping them all into the new "Gnomes" category seemed like a grand idea - Fun for me to do, fun for the specific buyers who wanted small pipes, and no risk for production time or sales.

Et voila, a new stamp marking was born: 

We've already got a great big florid "G" for Goblins, so the new mark is suitably small and focused, instead.

Pricing was the next big decision.  "Slap 'em together" and sell them for $40-50, scratches and stem gaps and all, or "Do them right" for twice the price because of the labor time?

It took about two microseconds to realize this was no choice at all, because I'm incapable of just leaving flaws that bug me - I'd end up sitting and tweaking and detailing regardless.

So, with that in mind, I'm pricing and crafting them for what they are - High-quality, high-detailed little jewels.  Airways are tapered and coned, bits are filed thin and comfortable, buttons are reshaped and thinned, bit slots are internally fanned for smooth airflow, bowls are magnifier-inspected to be scratch-free, and there's enough labor time built into the pricing to allow for some fun.  In these first ones, that fun equals two-toned finishes, with natural rims that fade down into rich brown bowl stains. 


So how small ARE the Gnomes?  Small enough to easily fit into a shirt pocket, to easily fall into the 10-20 gram weight range, and to be so light as to be effortless clenchers.  But, they're still big enough for a decent smoke - I'm not into making Kiseru, here.  To wit:


So that's the Gnomes!  The guiding principles:

Keep them small.
Make them quality.
Make them sprightly.
Make them fun.
Make them creative.
Keep them featherweight.

Friday, August 05, 2016

Ligne Bretagne - Classics and Uniques


Big news!


We're doing something new with Ligne Bretagne.  For the 14 years they've been in production, we've been plagued with one consistent issue - Lack of stock.  We post them, they sell out, and casual website visitors then write me to complain that all the pipes are always sold.  I don't blame them, I would not want to have to watch a site like a madperson 24/7 to insta-grab anything that got posted, myself.  The flip side is that we could not afford to do them as commissions, either.  The price levels they sell for simply don't accommodate the sort of back-and-forth consulting and talking that happen with every commission, and the limitations of working with machine-fraized shapes prevented a lot of the sort of size and shape requests customers might want anyway.

What to do?

Our solution is this - We're dividing Ligne Bretagne into two kinds of pipes, Ligne Bretagne Uniques (each one individual, the same as we've been doing), and Ligne Bretagne ClassicsLigne Bretagne Classics will be pipe designs that we work out carefully for repetition - Cuts of bowl, shank, stem length, band, and any other decor that we'll set up our workshop to reproduce accurately as many times as needed.  We'll select each bowl to be of consistent and matching grade to insure there will be no "losers" in our output.

And the best part is - You'll be able to order them.  


If you see a shape & design in the Ligne Bretagne Classics list that you like, you can purchase it right then!  Your order will go into our production queue and you'll receive an email with an estimated shipping date.  When your pipe is ready and finished, you'll receive specific photos of your personal pipe.  If you're happy with the results, your pipe will ship out as soon as we get your OK!

While the Ligne Bretagne Classics design list is small today (consisting of just two bulldogs for starters), we intend to add more shapes to it as time goes by.  We're starting with bulldogs because they've always been among our most popular sellers.

This makes things better for everyone - If someone wants to buy a design, they can, and they can be guaranteed of getting their pipe.  There's no racing to the page to try to grab something before the new stuff sells out.  Producing ongoing series of standardized pipe designs lets us save on production cost and time, savings that we can pass on to the buyers in the form of lower prices - Where our typical Ligne Bretagne Uniques tend to run around $175, Ligne Bretagne Classics can be ordered for $140 plus shipping.


I'll answer the two most likely questions here, and add more info as new questions arise.

Can I customize my order?  (Ex: I love the bulldog shape but I want one in red instead of black) - Not at the present time.  Maybe eventually... I'd like to be able to offer some checklist options in a drop-down menu style for finishes, especially, but for now I want to keep things simple to get these pipes off the ground as smoothly and successfully as possible.

Are these pipes any different from the other Ligne Bretagnes? - No.  They're made from the same aged stummels with the same stem materials, band materials, production techniques, and finishing processes as all our other pipes.  A Ligne Bretagne Classic is not a "cheaper" pipe... It just costs less!

Sunday, July 31, 2016

"But I won't do that"

I thought I might talk about the rules that individual pipemakers work by, in terms of form vs function.  I've seen a lot of beautifully sculptural pipe shapes in the past few years, and I love the looks of them and admire their originality and would make similar work myself, except... I always remind myself at the start of the workday that I am, ultimately, making a functional object, not a shelf sculpture.  It has to smoke, and it has to smoke well. 

A big part of that "smoking well" is down to the layout of the airhole, and how smoothly the smoke can travel from bowl to bit.  Have a look at some examples:


What you're seeing above, in cross-section, are a few examples of airhole layouts.  #5 at the top is the typical full-bent style, with an airhole that curves through the stem and then diverges at an angle from mortise to bowl.  #7 is an example of a more difficult shape, but still do-able - You have a curved airhole through the stem coming down to meet a small angle in the shank extension section meeting another angle at the tenon meeting another angle as the airhole bends back up towards the bowl.  Tricky, but it will still pass a cleaner.  #8 is an example of the sort of sharp angle that starts to become an issue.  The more that bend increases, the more likely a pipecleaner won't pass, even if the drilling is centered.  Also, the more it's likely to gurgle.

Back in my former life in HVAC, I had a decent education in duct systems.  The focus there is on consistent air movement, low noise, and smooth flow.  When I got into pipemaking, I applied a lot of these basic principles to my pipes, using what were at the time radical ideas like conical drillbits for stems to ease the resistance as the airhole flattened and widened toward the bit, as well as being a big proponent of the open draw.  The simple principle there is, the more complex the air passage is, the bigger the airhole needs to be to allow smooth flow. 

One trend that bugs me is the use of connecting airholes drilled at different angles and plugged to hide this fact.  Basically, you have an angle that's impossible for a straight drillbit, created using either a curved drillbit or two straight drills that form a bend.  It allows the creation of some stunningly sculpted pipes and I certainly envy the beauty of the results, but... I won't do that.  Why?  The minute that one uses a curved drilling or multiple angles in a sealed system, one has just cost the smoker the ability to ultimately clean and ream the airhole. 
It's not an immediate cost.  The pipe will probably smoke fine if the drilling is done well and the airhole is sized large enough.  The problem comes years later.  Airholes, just like bowls, accumulate cake inside with use, especially down near the bowl.  A couple years of regular use can reduce a 5/32" opening to a 9/64" or smaller, as the inlet gradually closes down.  That's why it's necessary to have a selection of long drill bits on hand for longterm maintenance, to enable the owner to push it through to the bowl and manually ream the airhole back to original size.  And that's why I don't do tricky airhole drillings, because... Full stop.  They can't be reamed. 

This is a perspective born of a couple decades of carving.  Wild shapes are seductive to new carvers, because they grab attention easily and have a powerful, "Hey, WOW, look at that artist!" Instagram/Twitter/Tumblr appeal for their visuals, but be careful - Some of those amazing shapes can come with some pretty annoying compromises, and they may not even become apparent till a few years down the road.

Wednesday, April 06, 2016

Defining a Symbolic Language of Pipes

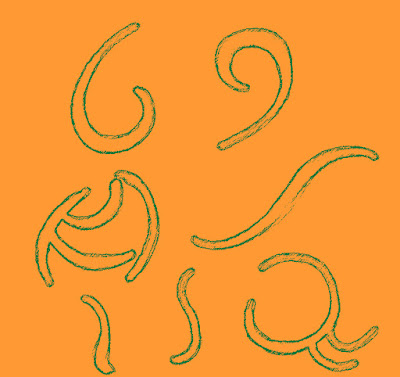
And how is that for an imposing and pretentious-sounding article title?  It isn't quite as esoteric as it might sound, though - Really, all I've been doing is gradually, over the years, assembling a visual "alphabet" per se, of the lines and curves and forms that I love in pipe design.  One can find pipe shape charts everywhere, but what I am after is more elemental, more of a fundamental means of building an attractive shape.  The Legos of Beauty, I might say.

(I will, however, readily admit that I'm one step from creating an alphabet in code form out of the lines and curves I'm defining, for the sole purpose of inserting secret words and riddles into the very shapes of the pipes I make... One of these days I'm going to go full-Kit Williams)

But enough of the prattle, let's see some pictures.  Here's one of of my symbol charts, where I've gathered together the basic curves and shapes that I love most:


In a nutshell, these are lines I have a passion for... specific curves and weights of line and flares and elegant twists that look good in pretty much any form, from nature to automobiles to human bodies.  There's an old-but-true saying that the more you can make your car/carving/anything resemble the curves of a reclining female, the prettier it will be.  What I'm trying to do is sit down and put together a fairly comprehensive collection of specific elements that can be blended together to create beauty to the eye, when they're put together in a harmonious way.

So far, so vague?  Let's try and showcase some of these lines in action:


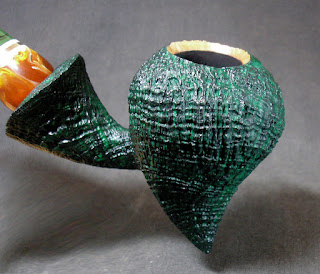
I dearly love the S curve, and try to work it into every bent pipe that I do.  Above and below you can see this philosophy as it's incorporated into the physical object of a handcut stem, in specific the stem of the Talbert Briar Emerald Teardrop.


S curves abound in my work, as well as teardrops and spirals.  Below I'm posting a few pics of the Emerald Teardrop - Take a look at the pics and the symbols above and see how many you can spot!


Thursday, January 28, 2016

Making a freehand

This is going to be a long post, but I'll try to keep the words to a minimum and let the photos do most of the talking.  Basically, this is how I make a freehand, and when I say "freehand", I mean a pipe with no advance planning as far as style goes.  The internal drilling is carefully plotted and it has a straight airhole connecting to a centered bowl chamber bottom, but as far as the shape went, I simply selected a plateau block with an unusual grain arrangement and decided to let the grain shape the pipe.  It's the antithesis of the working style that involves sitting down with graph paper and protractors and designing every detail of the pipe's shape beforehand.  Some guys are excellent at that, but I dislike working that way because it feels too mechanical for me.  On the other hand, working "without a net", so to speak, requires a LOT of courage and hope and the willingness to take crazy chances.  Both schools of design have their advantages and disadvantages.

Here you can see the total preplanning that was involved with this pipe.  Drilling angles, and a very basic idea of the shape size:


The initial shaping work defined the basic form along the flow of the grain.  It became obvious that the huge bird's-eye display across the front would be the centerpiece of the pipe.


The main surfaces are sanded smooth in the above photos to give me the most accurate idea of what the grain was going to look like, that I could then start fine-tuning the shape around the grain.  Also, it made a handy test to determine the level of flawlessness of the wood - If there were likely to be sandpits that would make the pipe a sandblast, they'd probably have shown up on those big smooth sections.

Next up was the stem.  I always work on the stem in tandem with the pipe so I can keep the two in visual balance with each other, as regards size and heft, and also match curves and lines.  Below you can see a smaller stem reject that I'm using as an initial model for this pipe's stem, which is handcut from German cumberland rod.


It's funny how my Taig lathe has become my favorite stem filing mount.  Takes all the strain off the wrists from holding the things by hand.  With a drill bit in each end, I can freely rotate the stem and compare the bit thickness to the size of the bit airhole, to get it thin without making it dangerously so.

Now you can see the pipe starting to come together.  The bit work is finished, leaving the body of the stem to be shaped to match the pipe.  The main shape of the bowl is now established along the lines of the grain flow, allowing the grain itself to determine the lines of the center curve that defines the pipe from front to back.  


It was still looking too chunky for me, though, so work from this point focused on tightening the base of the pipe inward - Still keeping to the arc of the grain, but emphasizing the strong heart-shape of the bowl via a more pointed bottom.


The bottom has been tightened inwards and the curves are more accentuated.  Now begins the stage of making the stem's freehand shape work with the pipe body.  Since it's a cumberland stem, it has "grain" of its own that needs to be considered and worked with, as well.  After some initial sketching of a couple of different ideas, I decide to go with a three-ringed approach using rings of diminishing size, with the nearest ring mirroring the curve of the shank end and the smaller ring curving in the opposite direction, giving a jaunty "flip" to the eye as it flares away from the bowl.


Once the basic shape of the stem rings was established and rough-carved, the bowl goes through a couple of processes to improve its initial smoking flavor, and is colored with a penetrating stain tint mixed with oil.  While that's drying, I work on finishing the stem in fine detail.  Once the pipe has received its final fine-sanding and polishing, it's finished!  What began as a block of wood is now a piece of sensually curving, smokeable craftsmanship.

_______________________________________________________________________

And that, above, is the "Making Of" part of my post.  This next bit is the "Why", where I'll attempt to explain a lot of the specific details of the shape and why they were done the way they were done.  This gets into the nature of how the eye sees lines and curves, but I'll try not to get too esoteric.

First up, I mentioned shaping the pipe around the grain.  This applies to a lot of the pipe that may not be initially obvious... such as the top arc line of the shank flare.  It wasn't chosen randomly.  When one looks down the length of the pipe, the arc of the shank's flat top edge follows the arcing curvature of the grain on the bowl:


Note that the curved swirl of the cumberland flows in the same direction.

It's not the only curve that matches, though.  The flat plane at the top of the shank mirrors the flat plane across the bowl top.  Moreover, the two stem rings are shaped differently for a reason - The larger one creates a visual echo of the bowl's round body curves:


The smaller stem ring, by contrast, is cut into a teardrop form that echoes the teardrop shape of the end of the shank:


Some of that is probably hard to make out in the photo.  Oh, for a better macro lens!   Even the top edge of the smaller stem ring has a gentle flattened curve to it that calls to the shank's top.

The other area of visual excitement that I wanted was in the shank & stem profile.  Why excitement?  The human eye loves matching curves - One of my art professors once stated bluntly, "The more your design reminds someone of a nude woman, the more beautiful people will find it."  While round shapes look nice in echo of each other, lines do best either converging or mirroring in opposition.  I could have made the stem lines copy the shank, but it wouldn't have been nearly as dramatic as this opposing curve (There's an edge there in the cumberland, which tends to look invisible in the photos due to the cumberland grain):


More curves playfully flip in opposing directions between shank and stem, giving the pipe a sense of dance, almost - Two in harmony, one in opposition:


Finally, the silhouette profile presents more curve harmony as multiple shapes echo:


In that respect, the dual-ring design of the stem shape becomes a smaller mirror of the relationship between bowl and shank flare.

And, in a nutshell, that's how I look at pipe design.